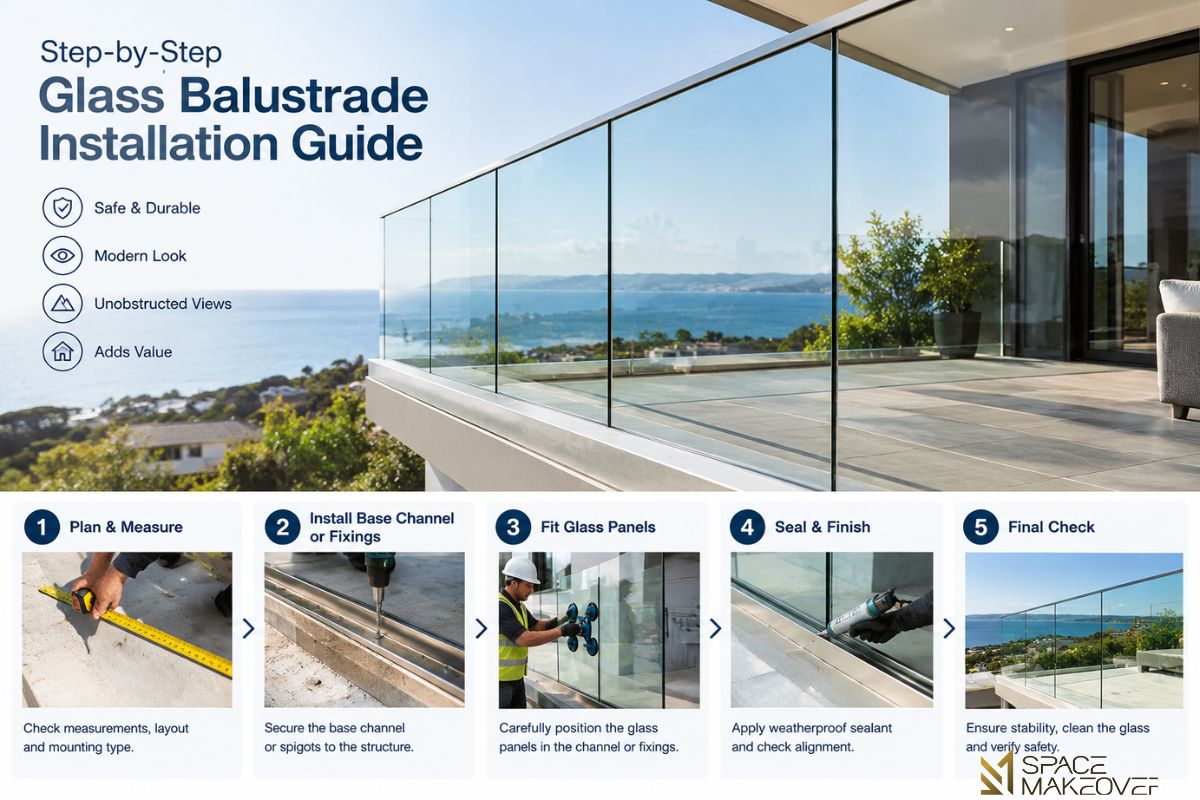
Step-by-Step Glass Balustrade Installation Guide
To install a glass balustrade, measurement is followed by the installation of a base channel or posts, placing the toughened glass panels, fixing a handrail, and performing safety checks. When done correctly, a clean and unobtrusive barrier is constructed that prevents injuries on balconies, terraces, mobile staircases, etc.
This guide explains each of the steps involved. Whether you are planning to do the work on your own or get quotes from contractors, you will know what is involved in the process of installation.
Glass balustrades in Dubai have become popular owing to their protective qualities, leaving views through the glass unaffected without obstructing the daylight. A standard balcony takes two days to complete with a small crew.
Key takeaways
- Carefully measure and verify each dimension from suppliers prior to cutting or ordering glass products.
- Select a balustrade style first because it affects base fixing details as well as structural needs.
- Place the base first, then put on a layer of glass before applying resin and sealing it correctly.
- Perform an entire safety check-up and contact appropriate people for permission to use it on your own balcony.
What is a glass balustrade?
A glass balustrade is considered a safety barricade constructed of toughened or laminated glass. Instead of just looking beautiful, they keep a clear view and save five-star safety standards for safety purposes. Almost all the glass systems are made to be either framed, semi-framed, or fully frameless, which means different styles meet different needs and different budgets.
Common balustrade types compared
Usually, glass systems can be divided into three categories that will determine the process of glass installation. Choosing the right type of glass system helps to make sure with necessary types and methods of mounting and support.
| Type | How the Glass Is Held | Visual Style | Relative Cost | Best Suited For |
| Framed | Aluminium frame around each panel | Traditional and sturdy | Lower | Budget projects |
| Semi-frameless | Top handrail with bottom channel | Balanced and modern | Moderate | Most residential balconies |
| Frameless | Point fixings and glass clamps | Minimal and open | Higher | Premium villas and penthouses |
Owners of balcony enclosures in Dubai, opt for glass due to its ability to minimize noise and dust pollution while allowing one to experience the outdoor environment. Nevertheless, frameless systems require the use of a stronger structural framework so it is necessary to check for structural integrity before purchasing materials.
What tools and materials do you need?
When starting on site, the right equipment will be collected beforehand, avoiding delays. The following are common items that most installers will have on hand:
- A laser level and a long level to check alignment.
- A tape measure, a marking chalk & a drawing chalk.
- A hammer drill fitted with carbide masonry bits that are the correct size for your anchors.
- Chemical resin, base plates and stainless steel anchor bolts as required by the design.
- Setting blocks, calibrated torque wrench and glass channel gaskets.
- A glass and weather-tight silicone sealant.
- Security suction panels for the safe handling of large panels.
The most challenging aspect of the project is usually the sourcing of the glass. When ordering panels from Dubai’s specialists, some homeowners choose to have toughened sheets cut to the exact size and have the edges polished before they are delivered to them. Pre-cut panels eliminate on-site grinding and the risk of chipping.
Safety equipment you should not skip
Heavy glass and working at height are involved in the installation, and so it is important that protective equipment is used. Always wear cut-resistant gloves when using panels; safety glasses when drilling. Additionally, wear a harness and secure an anchor point for work at height near the edge of a balcony that extends above ground level.
How do you measure and plan the layout?
This step should be taken seriously and must be done accurately to avoid most problems that can be encountered during installation. Take all measurements from post center to post center or wall to wall for fully channelled systems. Note the height from the finished floor also, as local guidance may establish a minimum height of about 1 metre for balcony barriers.
Before any drilling begins:
- Using a Slab level, check the level of the slab, and use a laser level to indicate any slope.
- Record the length, the height and the corner angles of each section.
- What is important is that holes are at least 100 mm from the edges of the slab to avoid cracking.
- Ensure the size of the panels is correct; check with your supplier, for example, glass works in Dubai.
- Take a picture of the setup and save it to your notes.
Drawing the plan out on paper is a great time saver on site! But always, measurements taken at the building will take precedence over drawings, since walls do not and slabs do not always line up exactly with drawings.
How do you install the base channel or posts?
The stability of the entire barrier will depend on the base fixing. Framed systems use posts, and semi-frameless and frameless systems use base channels or point fixings. In either case, the anchors should be transferred to solid concrete, not a thin screed or weak edge.
- Fixing the Base Channel
First, draw a level line along the slab, and use the laser level to ensure that it is parallel to the edge. Drill holes at the designated centers, remove the dust with compressed air, and install anchors. Place the channel over the anchors, level with a spirit level, and tighten the nuts evenly along the run.
Chemical resin requires curing time; do not load the channel until after the manufacturer’s recommended curing time. Many cases of later movement are due to haste in this step.
- Setting Posts for Framed Systems
The posts typically are secured to the slab with base plates or are sleeved. Tilt every post twice, in different directions, before tightening, as it will make a noticeable gap when the glass is ready in place! After fixings are tightened, re-check the alignment as torque may cause the post to move slightly.
How do you fit the glass panels?
Precision and patience are most critical when installing glass. Panels are heavy, fragile, and costly, so consider the lift before anyone touches the glass. Use suction lifters, have a minimum of 2 people on site, and unblock the way to the balcony.
- Lifting and Positioning the Glass
Use channel setters at the bottom of the channel to distribute each panel evenly. Gently place the glass into the channel, positioning it in the middle and away from the metal sides. Position the spacing so that it is level with the panel and the recommended expansion gap as specified by the manufacturer. Glass expands when it’s hot, and if there’s a tight gap, it can develop stress cracks in the summer heat in Dubai.
- Securing Panels and Adding Gaskets
Press the glass channel gasket into place on each panel on both sides. Tighten the clamps or top rail to the desired torque, starting at one section of the run to the other section to maintain even tension. Seal any exposed joints with silicone (weather-suitable). Never seal joints that are expected to move.
How do you install the handrail and finish?
The handrail is not only for the safety of users, but also to give form to the balustrade. Fit it after the glass has been secured to ensure that the finish is not compromised if it moves slightly while being fitted.
Follow these steps:
- Measure off the brackets on the top rail to match the glass fixings.
- Tighten brackets and use a level to verify all are secured.
- The handrail can be either slid or clipped into place and fastened with the included screws.
- Install end caps and cover plates for a clean edge.
- Wash the glass with a non-abrasive cleaner and never leave any protective film on the glass.
Moreover, the protective film must be removed after the installation is complete, so that the glass surface will not be scratched by dust under the protective film.
What safety checks are needed after installation?
A final inspection verifies that the barrier is able to resist typical and occasional forces. Before balcony use, perform the following checks:
- Push each panel down hard to make sure that it will not rattle or move.
- Inspect all fixings for proper torque and seating.
- Check that the quality and thickness of the glass are correct according to approved drawings.
- Look for gaps, cracks, or chips in gaskets, seals, and edges.
- Test the handrail by applying downward and sideways pressure.
Therefore, stop and correct any problem if any check fails before the use of the balcony. It can easily become a danger after months of wind and changes in temperature if a small fault occurs at installation time.
Should you hire a professional?
While many homeowners may be able to manage basic surface-mounted installations themselves, bigger ones require professional installation services by experts. A professional team provides tested software solutions and proper anchoring options for insurance policies. Also, they know about approvals for building projects, so it saves time and prevents expensive redo work.
Dubai approvals and building rules
Check with authorities like Dubai Municipality or your building management before beginning any work on a balcony modification project. Structural modifications and building envelope changes might need approval papers and records. Reputable suppliers of glass balustrades in Dubai are able to help us out during this project by providing all necessary documentation for it.
This document summarizes some of the key distinctions between working alone vs. hiring an employee.
| Factor | DIY Installation | Professional Installation |
| Upfront cost | Lower | Higher |
| Time required | Longer, with a higher chance of rework | Faster, on a planned schedule |
| Tools | Must be bought or rented | Usually included |
| Warranty | Usually none | Often provided |
| Risk of glass damage | Higher | Lower |
Choice is based upon skill level, price range, and complexity for a project. Simple projects may be suitable for confident DIY installers, whereas frameless systems on high-rise balconies typically require professional help.
Bottom line
Careful design of this glass balustrade gives you an attractive look while providing safety over time. Do it step by step using proper software; don’t forget about the final stage verification process. If you opt to install glass balustrade on your property whether it is an individual villa terraces of Dubai or apartments within cities then proper planning will make all the difference between them.
Design concepts and expert assistance are available through their designers at Space Makeover for everything from initial sketches up to final construction of barriers.
Frequently asked questions
A two-person team can install an outdoor enclosure for your balcony within 1-2 days at a Dubai location.
Balustrades are made of 12mm toughened or laminated glass that meets common safety requirements for residential balcony and terrace applications.
The price depends on glass type, size of window frame, and installation method; therefore, it is advisable to get an itemized quote from multiple vendors prior to making a purchase decision.